

Carbon fiber bicycle knowledge
How to adjust a rear derailleur and index your gears
There's little more annoying when cycling than clicking or jumping gears, so our video and step-by-step guide will help you adjust your rear derailleur and index your bike's gears.
Article reprinted from cyclist
A surefire way of interrupting your momentum at a key moment on a climb or when pulling away from traffic lights on your commute, badly indexed gears can irritate all the enjoyment out of cycling. Thankfully, adjusting a rear derailleur on a bike is a solution that is fairly simple and possible for most - if not all - home mechanics.
Multiple gearing has been available for bicycles since the late 19th century, but it wasn’t until SunTour launched its parallelogram derailleur in 1964 that the mode of changing gear became standardised. Modern versions of this design mean riders can now have up to 11 rear sprockets, but gears have not always been universally welcome.
In 1937, Henri Desgrange, founder of the Tour de France, stated, 'I still feel that variable gears are only for people over 45. Isn’t it better to triumph by the strength of your muscles than by the artifice of a derailleur?'
But should you choose the wimpy option, you should at least ensure your derailleur is set up correctly. Follow the five steps below to learn how to adjust your rear derailleur and save the expense of a trip to the bike shop.
How to adjust a rear derailleur and index your bike's gears
1. Set the limit screws

With the gear cable disconnected, gently pedal forwards until the chain drops onto the smallest sprocket. Find the cross-head screw towards the back of the derailleur marked H.
This dictates how far towards the frame the derailleur can move (the higher limit). Turning it clockwise moves the jockey wheel closer to the spokes, counter clockwise, closer to the frame.
You want the uppermost jockey wheel to sit directly below the smallest of the sprockets.

Turn the barrel adjuster on the derailleur clockwise until it is almost fully dialled in. Select the highest gear (smallest sprocket) on the shifter.
Pull the cable as tight as possible at the derailleur and attach it to the body via the cable anchor.
Once you have done this, select the third gear on the shifter and gently pedal forwards to shift the chain. Don’t worry at this point if it doesn’t shift smoothly.
Visually check the position of the jockey wheel relative to the cassette – it should fall directly beneath the third sprocket.
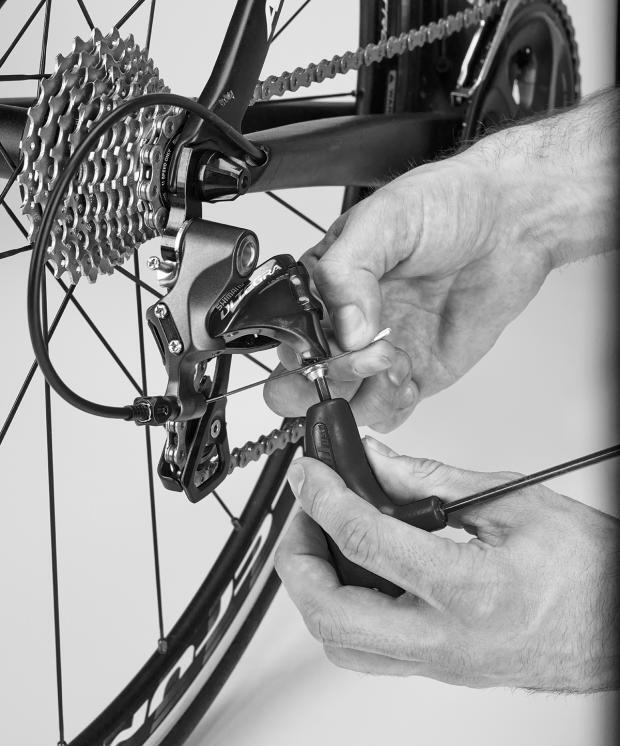
3. Adjust the cable tension

Use the barrel adjuster to fine-tune its position. Turning the adjuster anticlockwise increases tension on the cable, bringing the derailleur closer to the wheel; clockwise decreases the tension, moving it back towards the frame.
If the chain seems hesitant to shift up, increase the cable tension by turning the barrel adjuster anticlockwise. If it skips over a gear, turn the adjuster clockwise to decrease the tension.
Listening to the noise coming from the drivetrain will tell you when it’s set up correctly. You want it to run as quietly as possible.
4. Shift it up

Shift into the largest sprocket. Find the crosshead screw marked L (below the H screw). It dictates how far towards the wheel the derailleur can move (the lower limit).
Push the body of the derailleur until it’s as close to the wheel as it’ll go. The jockey wheel cage shouldn’t be able to move further than a position directly below the largest sprocket.
Turn the screw clockwise until the derailleur is unable to move beyond this point. This is crucial in order to prevent the derailleur getting tangled in the spokes.
5. B-tension screw

With the chain still on the largest sprocket, it’s time to adjust the B-tension screw – find it on the upmost part of the derailleur, next to where it joins the frame.
This dictates how close the upper jockey wheel sits to the cassette; it should be as close to the sprockets as possible without actually touching them.
Turning the B screw clockwise moves the jockey wheel away from the cassette. Tweak it until there is a gap of approximately 3mm.
Then take your bike out and enjoy trouble-free shifting for ever more – well, at least for a few months until it needs adjusting again.
0users like this.

Your cart is currently empty.